
I am sure most of you at least have an idea of how important it is to have a website that does not take ages to load. In fact, if you have a slow site, it could potentially be costing you money! Matthew Woodward lays out a pretty convincing statement of how a single second in delay could decrease your sites conversion by 7%. Which is extremely large when you sit down and think about it.
So now that you know that site speed = money, and your site is not properly optimized for speed, let’s do something to fix that.
Quick Note
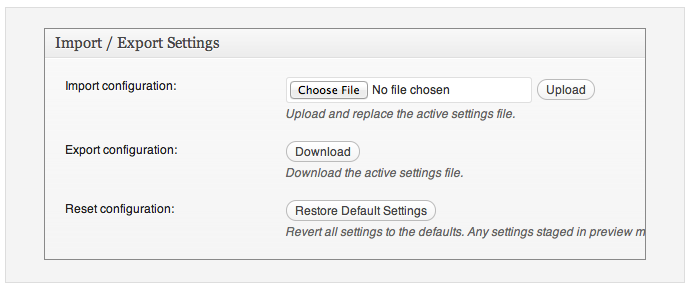
This tutorial that I am about to lay out will cover everything in detail. If you want to skip some of the steps, then please download the source files below. You can import them as soon as you have read the first step.
![]()
Alright, let’s begin the tutorial.
How to Speed Up Your WordPress Site
Install the Correct Tools
Install the best Caching Plugin: When I say install the best caching plugin, I am of course talking about W3 Total cache. If you are using any other type of caching plugin, I would recommend that you turn it off and delete it. Nothing really compares to W3 and what you can do with it. I am going to assume that you can go into your WordPress admin panel and download this plugin, just do not turn it on yet!
Install a Database Manager plugin: The plugin that I like to use is called WP-DBmanager. Do a search for it on the plugin page and it should come up as the first result. You should make sure that you do not have any other database plugins installed.
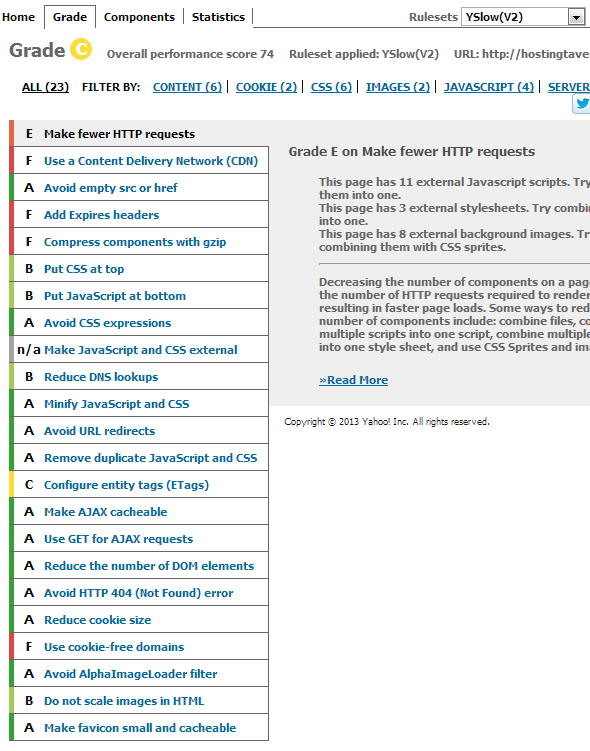
Now that you have two tools that we are going to use to help speed up your website, we first need to know a baseline for where your site sits now. To do this, we are going to use a Google Chrome plugin called ySlow. If you do not have chrome, go download it, and then head to THIS LINK to install the ySlow plugin. After it has been installed, you should see an icon in the upper right hand corner of your browser. Go to the homepage of your site and click this icon and let it run. It should only take a few seconds and spit out some results at you.
Yslow checks your site and basically tells you what you are doing well, what could use some improvements, and what is downright bad. The goal is to focus on anything that is lower than a B. In order to do this, I have gone through steps below in W3 Total Cache to improve the loading times of your sites.
Turn on the W3 Total Cache Plugin
After you have turned on the W3 Total Cache plugin, in your sidebar you should see a new tab that is called Performance. Click it! I am going to run you through all the steps on how to set this up properly but if you want to save some time you can import the source files that are available to download at the top of this page.
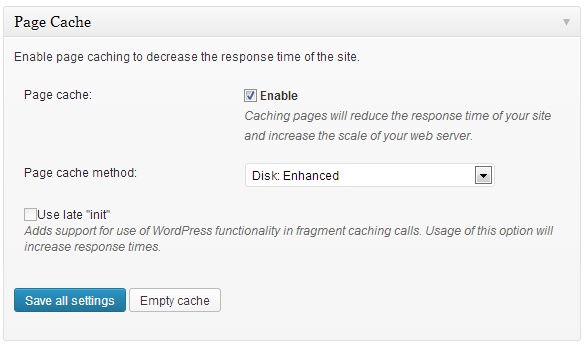
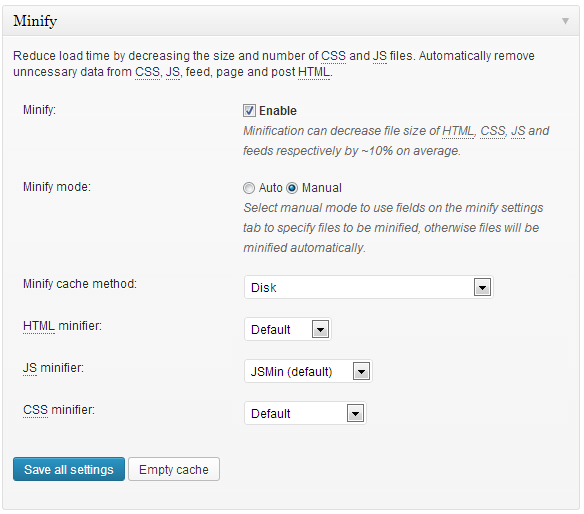
In the performance tap, this is where the W3 options are. The first thing we are going to take a look at is the General Settings. Check the following boxes to enable them:
- Page Cache (you will want to select the Disk:Enhanced option from the drop down menu. Selecting to cache your pages will bring down the response time of your site while increasing the web server scale.
- Minify: leave all the settings the same other than checking manual. This decreases the file size of your CSS, JS, feeds, and HTML by about 10%.
- Do not check the database cache because we will deal with the database later.
- Object cache should be selected and disk should also be selected in the drop down menu of this option. This will give you a huge leap in performance for dynamic sites.
- Browser Cache: You need to enable HTTP compression and add headers. This reduces the load on the server and also decreases file load times.
Time to Minify
Navigate over to the minify option in W3. The first thing you should see is the HTML and XML section. Check the first three boxes then go to the help button at the top and click that.
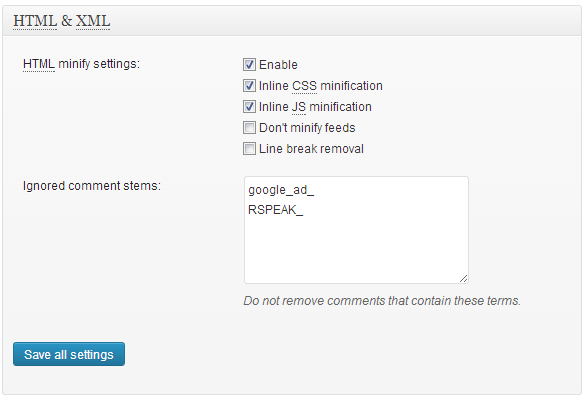
When the popover for the help screen pops up you will see a large list of javascript files and then stylesheets that your site is using. Check off everything EXCEPT:
- Google ads
- Jquery files
- stats.wordpress.js files (or any tracking files)
For the CSS options, you can check them all and still be very safe. What we are doing is minifying all the theme files so that they load a lot faster.
This step is one of the best improvements that we will see for the site. Once you have all the files selected that need to be, apply them all and close. Then click save all settings as soon as the popover closes. Make sure your site is still functioning properly.
Browser Cache
Go the browser cache tab in W3 Total Cache and find the “expires header lifetime”. Change the number that is there to 691200 seconds. Just this one thing will drastically improve your score on ySlow.
Go back to the general settings and empty all your caches. You can then return to your homepage and run the ySlow test again to see a nice jump in performance.
Let’s Optimize that Database
In the WordPress sidebar, under performance, you should see a tab that is called Database. If you do not, then you forgot to install the database plugin from the beginning of this tutorial.
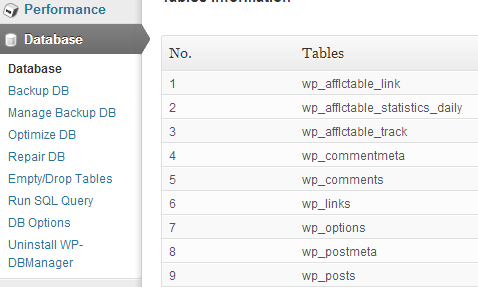
We are going to do three things with this plugin which are; backup, repair, and optimize.
Click on backup DB and then click backup at the bottom. You do not need to worry about gzipping.
The next step is to repair the database, so click on repair DB and finally click on repair at the bottom.
The final step is to optimize your database. Select the optimize DB option to the left and click on the optimize button at the bottom of the page.
You want to make sure that these happen on autopilot every few days. To do this, go into DB options. At the bottom you should see Automatic Scheduling. Make sure that you pick that backups are done daily. Set the plugin to optimize every couple of days and repair the database each week. Save all the changes.
CSS Sprites
When you ran ySlow, you almost certainly noticed that it told you to make fewer HTTP requests. Under this, it probably told you that there are so many external background images and that you should combine them into CSS sprites.
If all of these images could be just a single image, imagine how much faster your site would be? To do this, we are going to take advantage of a little tool called Spriteme. Don’t worry, it’s free. Go over and grab it RIGHT HERE. Do this in a new tab and have the homepage of your website in a separate tab.
![]()
When you have SpriteMe in one tab, and your homepage in another, you will want to drag the SpriteMe text that says “drag this link: onto the tab of your homepage. A box should appear at the right hand of your screen. Click on make sprite. Once it has finished and a picture pops up, save this image and then upload it to your WordPress.
![]()
Click the export CSS button and copy all the CSS code down. Each and every line. Then head over to the style.css of your theme, which should be located in Appearance > Editor > Style.css and paste all the code at the very bottom. You do not want to overwrite any of the default code so just paste it at the very end. In the code you are copying and pasting, it will say http://jaredhirsch.com. You will want to change this to the URL where you uploaded the sprite picture that you saved.
When you have completed this step, empty all caches again in the performance tab of W3.
Optimize Images
If you have access to Photoshop, this is a great way to compress your images before uploading them to your site. I know a lot of you do not have Photoshop so there is another way that you can make the file size of your images a bit smaller and help speed up your site.
First thing you need to do is check the images of your theme and if they are optimized. I like to use an app called Trimage. Try it out. If you are using a mac, then imageOptim is probably a better choice.
After all the theme images are compressed, check out Smush.it. It will optimize the images that you use in posts and pages.
GZIP it Up
This part is a great optimization technique but if you do not feel comfortable editing these files, go ahead and skip it. If you want to enable PHP Gzip compression, then you need to edit the php.ini with a text editor.
Find the following:
zlib.output_compression
For a default, it is set at off. You want to change this so it is on. It should look like this:
zlib.output_compression = On
After you have changed this, you need to restart your Apache server. Each page run by PHP will be compressed before it is even sent over the internet.
PHP can also be used to to adjust to different compression levels. These are between one and nine where one is least compressed and nine is going to be the most compressed. As a default, it was set to six. This generally gives the best compression without giving up server performance.
zlib.output_compression_level = 6
If you do not have access to the php.ini file becuase you might be on shared hosting, you can also do this from the .htaccess file. Add the following line to the .htaccess file:
php_flag zlib.output_compression on
Make sure to verify that the compression is working properly! You can read a small tutorial here.
More Info
There is just a few more things I want to mention. You have made a lot of changes so far. You should probably go back into W3 and empty all caches one more time.
Do a ySlow test again and see what it says. You should have seen another nice increase. You might see that it says that you should use a CDN or content delivery network. If you want to add a CDN the proper way, go ahead and read this tutorial HERE.
If you did everything properly, you should now be seeing a green A rating in ySlow. You can also check on Google’s page speed report as well.
Conclusion
When I first started off with WordPress, I would normally just download a few plugins on the site and call it a day for optimization. I have come a long way since then and by using the steps outlined above, you really can make a drastic difference in the speed of your site. It should take you about an hour to do all the steps above, but the time spent is well worth it.